Operating systems can end up being a lot of work for administrators; work to configure the image, work to install the applications, and work to provide the best user experience possible. As with any software, what is provided to you is what the developer intended, but not necessarily what you want or need for your end users.
This blog series introduces you to Windows® Operating System (OS) optimizations, starting with version 1903. I will attempt to keep these optimizations as environment agnostic as possible. Hopefully, these optimizations will be just as good to administrators of physical machines as to a virtual environment utilizing Nutanix Frame®, Citrix® Virtual Apps and Desktops, or VMware Horizon®.
This series aims to share the seemingly infinite number of ways you can optimize a Windows environment, with something for beginners as well as administrators familiar with optimizations but looking to deliver an even better experience within their environment.
Of course, the optimizations provided in this blog series are intended only as a guide. Be sure to vet any optimizations carefully and test the optimizations described in this series internally before pushing the changes to your production environment.
The first entry covered Active Setup. The second entry covered the Microsoft® Store. In each case, we discussed what each piece is, how it works, and how to optimize it.
This blog addresses two sections, specifically Services & Scheduled Tasks. More specifically, we will discuss their purpose, how they work, and what can be done to optimize them. These sections of the Windows OS have been around for a long time and while they do not change often, their ability to cause havoc in an environment has been thoroughly documented, see some examples here and here.
What are Services and Scheduled Tasks?
A Service is a program, usually invisible to the user, that runs at different points during the computer and/or user session lifetime. Most services are installed as part of the Windows OS, while some are installed through specific applications, such as the Google Chrome® browser.
Scheduled Tasks are very similar to Services, in that they will run, again usually invisible to the user, at different points during the computer and/or user session lifetime. Generally, Scheduled Tasks are either scripts or programs.
I know the above definitions may sound vague, but bear with me as I break all this down further.
How do Windows Services and Scheduled Tasks Work?
Windows Services are either set to start at boot or to run manually. When set to start at boot, they will run in the background while Windows is running. Manually set services are not truly manual, but won’t run without an external trigger, either via user interaction or via a programmatic event.
Windows Scheduled Tasks work differently from Services in that they have one or more triggers to determine when they run, such as At log on, Daily, a set time of day, or On Event. In addition, after a specific trigger is hit, the scheduled task can repeat off of that same trigger.
What Does this Mean for Me?
As opposed to what we saw previously with Active Setup and the Microsoft Store, there are no real differences between a physical/persistent scenario and a non-persistent scenario, utilizing physical machines or utilizing VDI/DaaS machines, with regards to Services or Scheduled Tasks.
Due to the way both Windows Services and Scheduled Tasks work, stopping and disabling unnecessary services and scheduled tasks can result in a faster boot and better overall logon experience, reduce CPU and memory utilization, and prevent unnecessary or unwanted third party telemetry generation and reporting.
Services
To view your Windows Services, simply open your Services Management Console (services.msc). This console will provide a list of services on the computer. Most services are necessary components of the Windows OS and should not be changed, but some can be turned off without any negative ramifications, outside of specific business usage.
There are too many services to list fully here, but below is a quick view of a Services Management Console.

Figure 1.
Now, this console will show quite a bit of information, but not necessarily everything we will need. The Name column specifically calls out the DisplayName, and not the actual Name of the service, which we will need later on. The Status column will show whether the Service is Running or not (Services that aren’t running will show as blank). The Status column can also denote Starting or Stopping, if you happen to catch it during those actions. The Log On As column shows which account is used by the service to run. You will mostly see services running under Local System, Local Service, or Network Service, but local or domain accounts may also be used to run the service.
If you open the Properties page of a service, either via double clicking or right clicking and choosing Properties, you can view more information about the service. What we are most interested in is the actual name of the service. For this, we will pick on one of my favorite services, the Connected User Experiences and Telemetry service.
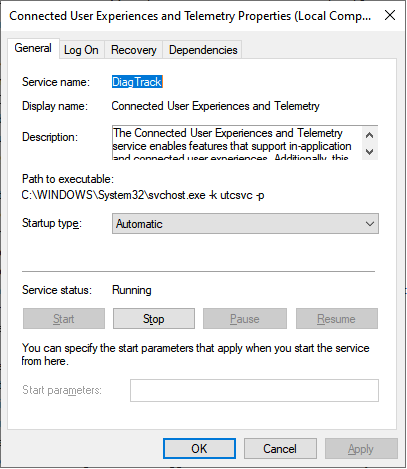
Figure 2
Now, as you can see from the above, the name you see from the column in the Services console is actually the Display Name and not the Service Name. While this bit of information is not necessary when manually interacting with the Services, it is useful when scripting against services and imperative when looking for them through the registry, which we will cover shortly.
In this window we have quite a few configuration options we can perform on this service. Since the focus of this blog is optimization, we will focus on the General tab only.
Under the General tab, you are able to change the Startup Type of the service, which is where you can disable the service, if you want to do it manually. Other options are Automatic, which causes the Service to start during boot, and Manual, which causes the Service to start when triggered externally, either via manual interaction or via an automated process such as a scheduled task or application. You also have the option to Start, Stop, Pause, and Resume the Service manually from this window.
Now, what you see in this console is simply the surface level view. While it gives you quite a bit of information, it does not give you everything. Remember those Service Names we were referencing earlier? This is where they become important. In the Registry Editor console (regedit.msc), you can find these services and change their settings.
To do so, in the registry browse to HKLM\System\(ControlSet)\Services. The (ControlSet) is a variable for different control sets within Windows. Explaining Control Sets is quite outside the scope of this blog, but you can find more information here, courtesy of Microsoft. Generally, you will be able to find what you need in the CurrentControlSet but you may potentially need to look in a specific Control Set, denoted by ControlSet###. It is here within the Services registry key where you will see the list of services using their Service Name instead of the Display Name. Using the Connected User Experiences and Telemetry service we talked about previously, which has a Service Name of DiagTrack, we will see further information about the service. While these values are necessary to the function of the Service, we will be focusing on the Start value, as this is the registry value that changes the Startup Type of the service.
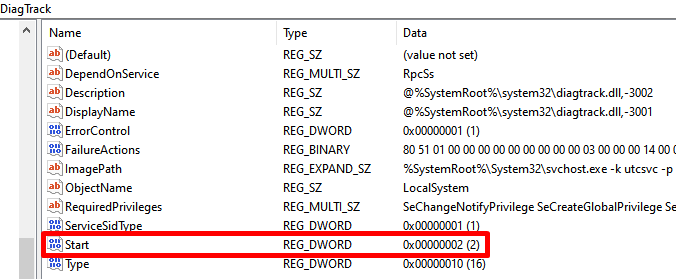
Figure 3
Now, to understand what options you have here, the below list denotes what each of the possible settings for the services are and what they mean.
- 0x00 – Boot – The kernel loaded will load this driver first.
- 0x01 – System – This is loaded by the I/O subsystem.
- 0x02 – Autoload (Automatic) – The service is always loaded and run.
- 0x03 – Manual – This service does not start automatically.
- 0x04 – Disabled – The service is disabled and should not be started.
As such, the above screenshot shows us that the DiagTrack service is set to start Automatically, verified when looking in the Services console against the Connected User Experiences and Telemetry service.
Now, let’s segue into Scheduled Tasks; we will return to Services a little later.
Scheduled Tasks
To view your Scheduled Tasks, open the Task Scheduler Management Console (taskschd.msc). This console will provide a list, broken up in different sections, of all the scheduled tasks running on the computer. There are a lot, so it can definitely be hard to find what you want, but I’ll try to provide a map for you to follow. Below is the layout of the locations in the Task Scheduler Console where Scheduled Tasks may reside. Your list will vary from mine, depending on multiple factors.
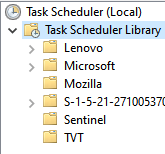
Figure 4
Now, most non-OS applications will place their Scheduled Tasks directly into the Task Scheduler Library group, but some, like Mozilla, will create their own structure to house their tasks. An example of a typical Task Scheduler Library list of tasks is shown below.

Figure 5
As you can see, there are quite a few tasks just in this location. Each of these tasks will run on your computer based upon the Triggers set in the task itself. These tasks will consume resources, report telemetry data to third-party remote services, and update applications, amongst other actions.
When a task is highlighted in this console additional information about that task is visible, which is pertinent to automating the optimizations of these tasks.

Figure 6
Now, we are going to focus on the information in the General tab, but each of the other tabs will show in-depth information about the inner workings of the Task. What we need, though, is the Name and Location of the Task.
Similar to Services, there are registry values that control Scheduled Tasks. This location is HKLM\Software\Microsoft\Windows NT\CurrentVersion\Schedule\TaskCache\Tasks. Unlike Services, the information kept in this location does not really help us, except in specific scenarios, which we will cover later.
How Do I Optimize Services and Scheduled Tasks in my Environment?
Good news! Both Services and Scheduled Tasks are very easy to optimize and have multiple methods to do so. I will cover the easiest and most direct method for optimization first, then call out outliers and alternate methods that may help in certain scenarios.
Please note, the main methodology I use for optimization is to use a PowerShell® script or commands. As such, from here on out a basic understanding of PowerShell is necessary. In an attempt to help, I will include links to Microsoft documentation for specific commands in places where confusion may occur, but that won’t supplant the need for PowerShell knowledge.
Services
For Services, optimizing means changing its Startup Type from its default to a Startup Type that performs in line with how you want it to perform. This can be changing an Automatic service to either Manual or Disabled, or changing a Manual service to Disabled. For the purposes of this blog we will be focusing on disabling Services.
Now actually changing the Startup Type for Services can be handled multiple ways. For most Services you can manually change the Startup Type using the services console as described above. This process can get a little tedious when you have to change these services for multiple machines. As such, there are PowerShell commands you can run to change services as well.
Stop-Service -Name (ServiceName) is one of the commands you can use to stop a running service. The -Force parameter will force the service to stop in case there is a conflict. As such, this time picking on the Windows Update service, you would use Stop-Service -Name wuauserv -Force. Another option, if you wanted to use the Display Name variable instead of the Service Name variable, would be to use Get-Service -DisplayName (DisplayName) and pipe that output to the Stop-Service command, which looks like Get-Service -DisplayName “Windows Update” | Stop-Service.
To be clear, the above commands only stop a running service, not disable it. Before disabling any service, you should stop it, as a disabled service will continue to run if set to Disabled while it’s running.
To disable a service the command is Set-Service -Name (ServiceName) -StartupType Disabled. Change out Disabled in the previous command for Manual if you want the service to run manually.
So now what do we have:
Stop-Service -Name wuauserv -Force
Set-Service -Name wuauserv -StartupType Disabled
These simple lines will stop the service or services you denote and disable a good portion of those same services. I say a good portion because there are services that will not disable through the normal methodology. You may have run into some. One of particular note is the Windows Update Medic Service. This service is designed to watch over the Windows Update service and, if stopped or disabled, return it to a functioning place. As opposed to the above methodology, both attempting to disable through the console and through the PowerShell commands, the Windows Update Medic Service has to be disabled via registry values changes.
Running with Set-Service:

Figure 7
Now, obviously, you can make this change via the registry manually if you wish, using the information found near the beginning of this blog, but what’s the fun in that? You can do this work via PowerShell as well using the following command:
Set-ItemProperty HKLM:\SYSTEM\CurrentControlSet\Services\(ServiceName) -Name Start -Type DWord -Value 4
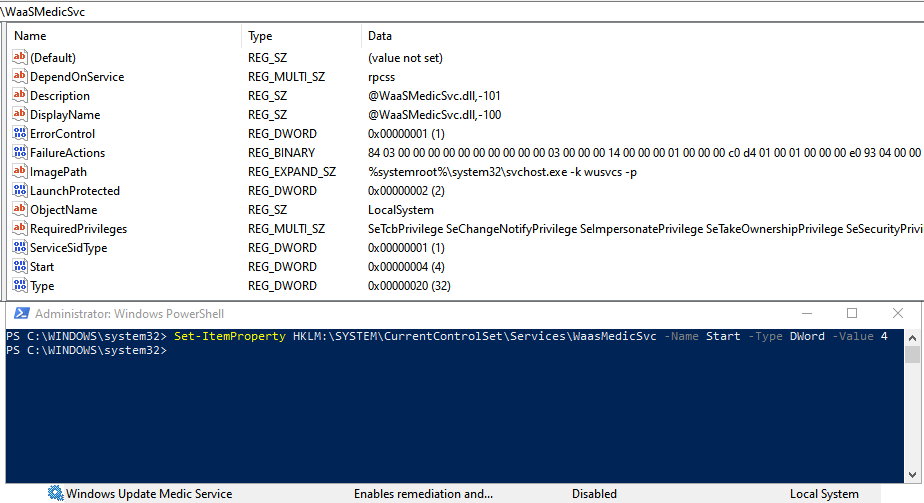
Figure 8
Now, as there are potentially a large number of Services to disable, you wouldn’t necessarily want to write out these sections manually for each service, so let’s get a little deeper here.
Using an Array in PowerShell you can create a collection of Services which you can run the same actions against repeatedly. To create an array for both the Windows Update and Windows Update Medic Service, you would use the below syntax.
$Services = @("wuauserv","WaasMedicSvc")
Using the above command, you are using $Services as an array name, also called a collection. This array will be used later to pull each item in the array out to perform actions against. This name can be anything you want, e.g. $Serv or $ser, but once used later changing may require larger script changes to accommodate. The “@” symbol is what specifies that an array will be used.
An array can contain multiple items by delineating between entries using a comma. As such the above array can be set to use any number of items you want. In addition, since a single line for that type of length would get hard to read, you can edit the command to contain separate lines for easier viewing. Please note that using the methodology below does not require the comma at the end of the line like it does when it’s all on one line. I generally keep it in for consistency’s sake.
$Services = @(

“wuauserv”,

“WaasMedicSvc”

)
Now, what do we do with this array? For that we would run a ForEach command, which pulls each item separately from the array to run commands against one at a time, against every item inside of the $Services array. To do this, we used a new variable to specify each item within the array. To make it easier, we will use $Service to denote a single service within the greater $Services array of multiple services. This variable can be anything, but the $Services is now hard set by the array and is therefore unchangeable without also editing the array name.
ForEach($Service in $Services) {action}
The logic behind a ForEach is ForEach ($<item> in $<collection>){<statement list>}. So $Services represents the collection/array we denoted above, while $Service denotes a single item inside that collection, e.g. wuauserv.
Now what do you want to do in that {action} section? Well, we can use the Stop-Service and Set-Service commands described above, which would look like this:
ForEach($Service in $Services) {

Stop-Service $Service -Force

Set-Service $Service -StartupType Disabled

}
Instead of calling out the service name explicitly, you are using the $Service item within the ForEach, which pulls from the $Services collection. The entire command you would use to do this work would look like:
$Services = @("wuauserv","WaasMedicSvc")

ForEach($Service in $Services) {

Stop-Service $Service -Force

Set-Service $Service -StartupType Disabled

}

Figure 9
Now, as we can see from the above, there were no error messages against the Windows Update service, since the Set-Service command can be run against it without problem. The Windows Medic Update Service, as discussed previously, will fail.
In the case of those services that require the registry method to disable, the script would look more like the below:
$Services = @("wuauserv","WaasMedicSvc")

ForEach($Service in $Services) {

Stop-Service $Service -Force

Set-ItemProperty HKLM:\SYSTEM\CurrentControlSet\Services\$Service -Name Start -Type DWord -Value 4

}

Figure 10
The registry method, on the other hand, completes without error for both services, since it’s handled in a different way.
Now, that’s a lot of PowerShell knowledge dropped on you in a short period of time. Since the easiest way to optimize environments is via a script of some sort, the understanding of a scripting language, in this case PowerShell, can be imperative. If you need or want more information on these PowerShell commands and how they work together please visit the following links:
Now, back to Scheduled Tasks.
Scheduled Tasks
As Scheduled Tasks are basically scripts that are running due to specific triggers, the key to optimizing them is to just prevent them from running at all. As with Services, this can be done in multiple ways. The most common way, but definitely not the easiest, is to use the Task Scheduler console. Since there are quite a few Scheduled Tasks that can be optimized, using the console to do so can be very time consuming.
So let’s talk about how you can do the same in an automated fashion. The PowerShell command Disable-ScheduledTask -TaskName (Path of Task)(Name of Task) is one command you can run, another being Disable-ScheduledTask -TaskPath (Path of Task) -TaskName (Name of Task). But the (Path of Task) and (Name of Task) information may be a little less straightforward. Since the command is dependent upon both the location as well as the name of the task, you will need to know at least one to be able to find the other. I have found that the easiest way to accomplish identifying both is to find the (Name of Task) and use that to find the (Path of Task).
Finding the TaskPath and TaskName can be done in a couple ways, of which the easiest is to use the Task Scheduler console. First, find the task that you want to optimize. For this example, I will use the Microsoft Compatibility Appraiser task. Once you have found the Task you wish to optimize, on the General tab of the selected Task, you will find the Location (marked as 1 in the screenshot below) and Name (marked as 2 in the screenshot below) fields. The Location field is equivalent to the (Task of Path) variable, while the Name field is equivalent to the (Name of Path) variable. Now, utilizing the information in the screenshot below, if I were using the former command the syntax would be Disable-ScheduledTask -TaskName “\Microsoft\Windows\Application Experience\Microsoft Compatibility Appraiser”. If using the latter command the syntax would be Disable-ScheduledTask -TaskPath “\Microsoft\Windows\Application Experience\” -TaskName “Microsoft Compatibility Appraiser”. Please note the leading and trailing “\” are both necessary in either command.

Figure 11
If you already know the TaskName you can use it to find the TaskPath in the registry, although this is a little harder. First, using a registry editor, browse to HKLM\Software\Microsoft\Windows NT\CurrentVersion\Schedule\TaskCache\Tasks, under which you will see a list of GUID registry keys. Example below.

Figure 12
You would then need to search through every GUID registry key until you find the one that matches the Task you wish to view, which may not be easy. For instance, the Microsoft Compatibility Appraiser mentioned earlier has a GUID, on my test machine, of {7A5AFDB2-56EC-4352-AB44-069E7BF253A8}, which is quite far down the list. Once you are at the Tasks key, you can do a search for the name of the task and you should be brought to the proper key location. Once there, you would use either Path or the URI value as the task name in the command.
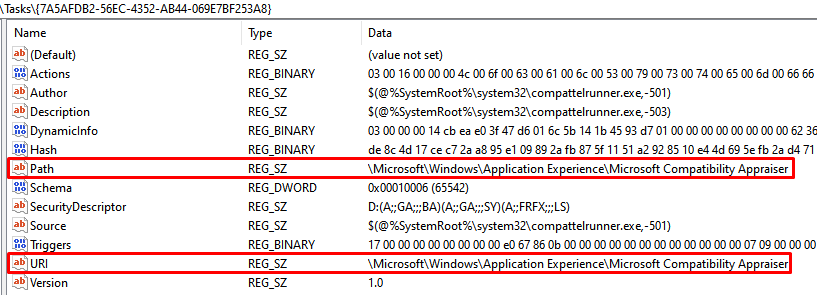
Figure 13
Last but not least, you can find either the TaskName or the TaskPath using the other via PowerShell. This can be accomplished with the Get-ScheduledTask command, using the -TaskPath variable to identify the TaskName, as below.

Figure 14
You can also use the -TaskName variable to identify the -TaskPath, as below.

Figure 15
One odd part of this scenario are tasks that live directly in the Task Scheduler Library. Usually these tasks are application specific, such as update tasks for Google Chrome. While the Scheduled Tasks that live in the Task Scheduler Library have a location, it’s analogous to Root and therefore only shows as a \ in PowerShell outputs.

Figure 16
Now, despite having a TaskPath that contains a location, the PowerShell command to disable these specific Tasks does not require it. As such, the command to disable the GoogleUpdateTaskMachineCore Task is Disable-ScheduledTask -TaskName GoogleUpdateTaskMachineCore.

Figure 17
Now, once you have the TaskPath and TaskName, you can run either PowerShell command at will, even using it in a script to automate the process of disabling these tasks, but much like Services above, this can get clunky. As such, using the same Array methodology as Services can simplify disabling multiple tasks. Please note the remainder of this blog will utilize the combination of the -TaskPath and -TaskName into a single variable for simplicity’s sake.
$ScheduledTasks = @(“\Microsoft\Windows\Application Experience\Microsoft Compatibility Appraiser”, “\Microsoft\Windows\Defrag\ScheduledDefrag”)
Now, using this in a ForEach, same as with Services, allows us to execute repeatable actions against every single item in the $ScheduledTasks variable we created. Since disabling scheduled tasks is a single command instead of multiple like services, it’s fairly basic.
ForEach($ScheduledTask in $ScheduledTasks){

Disable-ScheduledTask -TaskName $ScheduledTask

}
In this case, the entire command string would look similar to the below.
$ScheduledTasks = @(“\Microsoft\Windows\Application Experience\Microsoft Compatibility Appraiser”, “\Microsoft\Windows\Defrag\ScheduledDefrag”)

ForEach($ScheduledTask in $ScheduledTasks){

	Disable-ScheduledTask -TaskName $ScheduledTask

}

Figure 18
What are the Potential Downsides to Optimizing Services or Scheduled Tasks?
The downsides to optimizing Services and Scheduled Tasks can range from none to mild to catastrophic. Each Service or Scheduled Task has a function. If that function doesn’t run but is required by other services or applications, the entire logic chain can break down, causing system or application instability. Moreso then with Active Setup or the Microsoft Store, vetting these items is imperative.
Good news though. With Services and Scheduled Tasks, generally, if you disable them you can enable them to allow proper functionality to return.
One very important thing to note: Microsoft, in the past, has added functionality to already existing services. While it doesn’t happen often, these potential changes could enable previously disabled services and tasks while also changing them to necessary items. In addition to monitoring services and tasks after application installs, verify any possible changes after any Feature Update for the OS and test functionality of the service or task again.
One good example of this scenario is the Connected Devices Platform Service. When this service was first released, it was easy optimization fodder, as it didn’t do much. Since then the scope of the service has increased and now tools that provide optimization to images are removing this service from their list or actively providing rollback of the service to enabled status.
What Services and Scheduled Tasks can be optimized?
Necessary services and/or scheduled tasks change based upon the environment you are attempting to optimize. You would potentially see far more use of the Bluetooth services on a physical machine than you would in a VDI environment. In addition, services may be relied on by applications specific to your environment. This provides another level of decision making in determining what is necessary vs. unnecessary in any environment.
As such, and I can not stress this enough, please fully understand and test any changes to Services before implementing these changes to any production environment, whether it be physical or virtual.
Services
Now, the below services are the most common Services that I disable, which happens mainly in a Nutanix Frame environment. Customize as needed.
The below list will contain the Display Names of the services. Note: the services below preceded by a * will have random information appended to the end of their Service and Display Names.
The first batch of Services exist across Windows 10 as well as Server 2016 and Server 2019.
|
|
|
|
|
|
|
|
|
|
|
|
|
|
|
|
|
|
|
|
|
|
|
|
|
|
|
|
|
|
|
|
|
|
|
|
|
|
|
|
|
|
|
|
|
|
|
|
|
|
|
|
|
|
|
|
The second batch of Services are specific to Windows 10 and Server 2019.
|
|
|
|
|
|
|
|
|
|
|
|
|
|
|
|
|
|
|
|
|
|
|
|
|
|
|
|
|
|
|
|
|
Scheduled Tasks
Now, as with Services, the below are the most common Tasks that I disable. Again, this happens mainly in a Nutanix Frame environment. Customize as needed.
The below list will contain the TaskPaths and TaskNames in one clump. This will make it easier to find and research the Tasks when vetting this information for your environment.
The first batch of Tasks exist across Windows 10 as well as Server 2016 and Server 2019.
- \Microsoft\Windows\Application Experience\Microsoft Compatibility Appraiser
- \Microsoft\Windows\Application Experience\ProgramDataUpdater
- \Microsoft\Windows\Autochk\Proxy
- \Microsoft\Windows\Bluetooth\UninstallDeviceTask
- \Microsoft\Windows\Data Integrity Scan\Data Integrity Check and Scan
- \Microsoft\Windows\Data Integrity Scan\Data Integrity Scan
- \Microsoft\Windows\Data Integrity Scan\Data Integrity Scan for Crash Recovery
- \Microsoft\Windows\Diagnosis\Scheduled
- \Microsoft\Windows\DiskCleanup\SilentCleanup
- \Microsoft\Windows\DiskDiagnostic\Microsoft-Windows-DiskDiagnosticDataCollector
- \Microsoft\Windows\DiskDiagnostic\Microsoft-Windows-DiskDiagnosticResolver
- \Microsoft\Windows\DiskFootprint\Diagnostics
- \Microsoft\Windows\DiskFootprint\StorageSense
- \Microsoft\Windows\FileHistory\File History (maintenance mode)
- \Microsoft\Windows\Location\Notifications
- \Microsoft\Windows\Maintenance\WinSAT
- \Microsoft\Windows\Maps\MapsToastTask
- \Microsoft\Windows\Maps\MapsUpdateTask
- \Microsoft\Windows\MemoryDiagnostic\ProcessMemoryDiagnosticEvents
- \Microsoft\Windows\MemoryDiagnostic\RunFullMemoryDiagnostic
- \Microsoft\Windows\Mobile Broadband Accounts\MNO Metadata Parser
- \Microsoft\Windows\NetTrace\GatherNetworkInfo
- \Microsoft\Windows\Offline Files\Background Synchronization
- \Microsoft\Windows\Offline Files\Logon Synchronization
- \Microsoft\Windows\PI\Sqm-Tasks
- \Microsoft\Windows\Power Efficiency Diagnostics\AnalyzeSystem
- \Microsoft\Windows\Ras\MobilityManager
- \Microsoft\Windows\RecoveryEnvironment\VerifyWinRE
- \Microsoft\Windows\Registry\RegIdleBackup
- \Microsoft\Windows\Servicing\StartComponentCleanup
- \Microsoft\Windows\Shell\IndexerAutomaticMaintenance
- \Microsoft\Windows\SpacePort\SpaceAgentTask
- \Microsoft\Windows\SpacePort\SpaceManagerTask
- \Microsoft\Windows\Speech\SpeechModelDownloadTask
- \Microsoft\Windows\Windows Error Reporting\QueueReporting
- \Microsoft\Windows\Windows Filtering Platform\BfeOnServiceStartTypeChange
- \Microsoft\Windows\WindowsUpdate\Scheduled Star
- \Microsoft\XblGameSave\XblGameSaveTask
The second batch of Tasks are specific to Windows 10 and Server 2019.
- \Microsoft\Windows\Application Experience\StartupAppTask
- \Microsoft\Windows\BrokerInfrastructure\BgTaskRegistrationMaintenanceTask
- \Microsoft\Windows\Chkdsk\ProactiveScan
- \Microsoft\Windows\CloudExperienceHost\CreateObjectTask
- \Microsoft\Windows\Customer Experience Improvement Program\Consolidator
- \Microsoft\Windows\Customer Experience Improvement Program\UsbCeip
- \Microsoft\Windows\Defrag\ScheduledDefrag
- \Microsoft\Windows\Diagnosis\RecommendedTroubleshootingScanner
- \Microsoft\Windows\Flighting\FeatureConfig\ReconcileFeatures
- \Microsoft\Windows\Flighting\OneSettings\RefreshCache
- \Microsoft\Windows\HelloFace\FODCleanupTask
- \Microsoft\Windows\InstallService\ScanForUpdates
- \Microsoft\Windows\InstallService\ScanForUpdatesAsUser
- \Microsoft\Windows\InstallService\SmartRetry
- \Microsoft\Windows\International\Synchronize Language Settings
- \Microsoft\Windows\LanguageComponentsInstaller\ReconcileLanguageResources
- \Microsoft\Windows\Location\WindowsActionDialog
- \Microsoft\Windows\Management\Provisioning\Cellular
- \Microsoft\Windows\NlaSvc\WiFiTask
- \Microsoft\Windows\PushToInstall\LoginCheck
- \Microsoft\Windows\PushToInstall\Registration
- \Microsoft\Windows\Shell\FamilySafetyMonitor
- \Microsoft\Windows\Shell\FamilySafetyRefreshTask
- \Microsoft\Windows\StateRepository\MaintenanceTasks
- \Microsoft\Windows\Subscription\EnableLicenseAcquisition
- \Microsoft\Windows\Subscription\LicenseAcquisition
- \Microsoft\Windows\Sysmain\ResPriStaticDbSync
- \Microsoft\Windows\Sysmain\WsSwapAssessmentTask
- \Microsoft\Windows\SystemRestore\SR
- \Microsoft\Windows\USB\Usb-Notifications
- \Microsoft\Windows\WCM\WiFiTask
- \Microsoft\Windows\WDI\ResolutionHost
- \Microsoft\Windows\Windows Defender\Windows Defender Cache Maintenance
- \Microsoft\Windows\Windows Defender\Windows Defender Cleanup
- \Microsoft\Windows\Windows Defender\Windows Defender Scheduled Scan
- \Microsoft\Windows\Windows Defender\Windows Defender Verification
- \Microsoft\Windows\Windows Media Sharing\UpdateLibrary
- \Microsoft\Windows\Work Folders\Work Folders Logon Synchronization
- \Microsoft\Windows\Work Folders\Work Folders Maintenance Work
- \Microsoft\Windows\WOF\WIM-Hash-Management
- \Microsoft\Windows\WOF\WIM-Hash-Validation
- \Microsoft\Windows\WwanSvc\NotificationTask
Additional Tips
As with the Microsoft Store options discussed in the previous blog, the Out-Gridview PowerShell can be your friend to identify Services or Scheduled Tasks in a graphical format that you want to disable. For Services, the command to do so is Get-Service | Out-GridView -PassThru | Stop-Service to stop the service and Get-Service | Out-GridView -PassThru | Set-Service -StartupType Disabled to disable those services that can be disabled via the Set-Service command. Any item you highlight using Out-GridView will output and be piped into the next command.
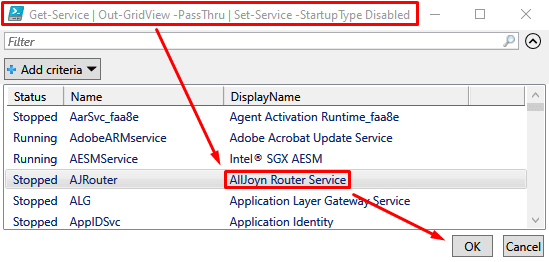
Figure 19
This can also be done for Scheduled Tasks. To do so the command is Get-ScheduledTask | Out-GridView -PassThru | Disable-ScheduledTask. Additionally this provides another method to identify the location of the Scheduled Task.
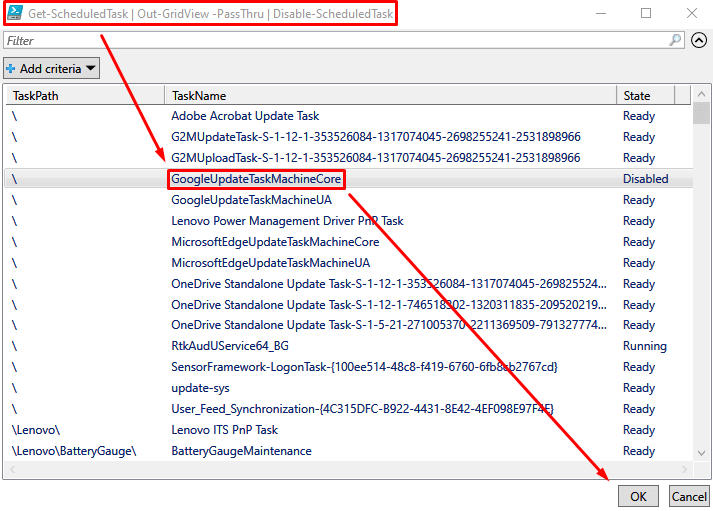
Figure 20
What’s Next?
This post covers Services and Scheduled Tasks as they relate to Operating System optimization, but both Services and Scheduled Tasks can be used by any developer as part of their application deployment. As always, we recommend checking all Services and Scheduled Tasks, either periodically or after each application installation, to verify new entries have or have not been added. If they have, vet them for purpose, and then remove or keep them as needed.
The next blog post will discuss Startup Items, mainly focusing on Run and RunOnce registry keys. This area of the OS directly corresponds to End User Experience (UX) as these areas can greatly impact your logon or post-logon times, and should be considered for any optimization task. If you need assistance in optimizing your VDI or DaaS images, check out our Xpert Services Template Image Creation and Optimization service.
Jake Norman is a Senior Consultant with Nutanix Professional Services. He has been a part of the Professional Services team for 2 years and prior to that spent 15+ years in a myriad of different environments focusing on EUC and UX work.
© 2021 Nutanix, Inc. All rights reserved. Nutanix, the Nutanix logo and all Nutanix product, feature and service names mentioned herein are registered trademarks or trademarks of Nutanix, Inc. in the United States and other countries. Other brand names mentioned herein are for identification purposes only and may be the trademarks of their respective holder(s). This post may contain links to external websites that are not part of Nutanix.com. Nutanix does not control these sites and disclaims all responsibility for the content or accuracy of any external site. Our decision to link to an external site should not be considered an endorsement of any content on such a site. Certain information contained in this post may relate to or be based on studies, publications, surveys and other data obtained from third-party sources and our own internal estimates and research. While we believe these third-party studies, publications, surveys and other data are reliable as of the date of this post, they have not independently verified, and we make no representation as to the adequacy, fairness, accuracy, or completeness of any information obtained from third-party sources.
This post may contain express and implied forward-looking statements, which are not historical facts and are instead based on our current expectations, estimates and beliefs. The accuracy of such statements involves risks and uncertainties and depends upon future events, including those that may be beyond our control, and actual results may differ materially and adversely from those anticipated or implied by such statements. Any forward-looking statements included herein speak only as of the date hereof and, except as required by law, we assume no obligation to update or otherwise revise any of such forward-looking statements to reflect subsequent events or circumstances.